
To solder LED strips to wire, you will need a soldering iron, some solder, and a heat sink. First, tin the wires by applying a small amount of solder to each one. Then, position the LED strip so that the pads you want to connect are touching the tinned wires.
Apply heat to the pad and wire simultaneously with the soldering iron until the solder melts and flows onto both surfaces. Remove the iron and allow the joint to cool. Repeat for all connections.
- Strip the insulation off of the end of the wire using wire strippers
- tin the end of the wire by applying a small amount of solder to it
- Place the tinned end of the wire against one of the pads on the LED strip and apply heat with a soldering iron until the solder melts and flows onto both the pad and wire
- Repeat step 3 for each LED in your strip until all LEDs are soldered to wires
- Connect each wire to its corresponding pin on your controller or power supply according to your circuit diagram
What Solder to Use for Led Strips
There are a few different types of solder that can be used for LED strips, but the best type to use is lead-free solder. This type of solder does not contain any lead, which is a toxic metal that can be harmful to humans. Lead-free solder also has a lower melting point than other types of solder, making it easier to work with.
When soldering LED strips, it’s important to use a thin layer of solder so that it doesn’t obscure the light. Too much solder can also make it difficult to attach the LEDs securely. If you’re using a soldering iron, be sure to set it to a low temperature so that you don’t damage the LEDs.
It’s also important to use flux when soldering LED strips. Flux helps remove oxidation from the metals being joined, and prevents new oxidation from forming. This ensures that the connection between the LED strip and the soldered joint is strong and long-lasting.
Credit: www.ecolocityled.com
Can You Solder Led Light Strips?
Yes, you can solder LED light strips. In order to do so, you will need a soldering iron, some solder, and a heat sink. You will also need to know which wires go to which pads on the LED strip.
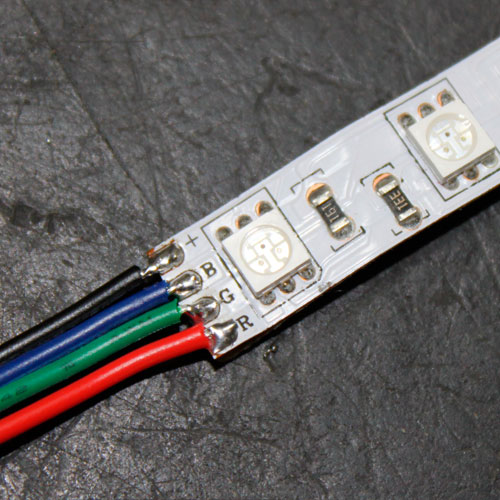
The positive wire is typically the longer of the two wires, and it goes to the anode pad. The shorter wire is the negative wire and it goes to the cathode pad.
First, tin the tip of your soldering iron with some solder.
Then apply heat to one of the pads on the LED strip while holding solder against it until the pad melts and becomes shiny. Add more solder if needed. Do not move the soldering iron around too much or else you risk making a cold joint which will not be as strong or conductive.
Now do the same thing for the other pad.
Once both pads have been soldered, carefully trim any excess wire using flush cutters or scissors so that there is no risk of shorting anything out. Finally, apply heat shrink tubing over each connection in order to insulate them and prevent any further oxidation from happening.
What Kind of Solder Wire Do You Use for Led Strips?
When it comes to soldering LED strips, there are a few things you need to keep in mind. The first is that you need to use a solder wire that is lead-free. This is because the lead in traditional solder can be harmful if it comes into contact with skin.
Lead-free solder is also more environmentally friendly.
The second thing to keep in mind is that the thickness of the solder wire you use will affect how well the connection holds. For LED strips, it’s best to use a thinner gauge wire so that there’s less risk of damaging the delicate components.
Finally, pay attention to the melting point of the solder wire you’re using. Some types of solder have a lower melting point than others, which means they can be easier to work with but may not create as strong of a connection.
Can You Solder Led Wires?
Yes, you can solder LED wires. LEDs are made of semiconductor materials, which means they have a P-N junction. When you apply a voltage to an LED, the current flows through the P-N junction and creates light.
You can use a soldering iron to attach leads to an LED so that it can be used in circuits.
The best way to solder LED wires is to first tin the leads with solder. This will make it easier for the heat to transfer from the soldering iron to the lead.
Then, touch the tip of the soldering iron to both the lead and wire that you want to attach. The heat will flow from the iron into the lead and wire, and then the solder will flow onto both surfaces. Hold the parts together until the solder cools and solidifies.
If you need to remove a lead from an LED, you can use a desoldering tool or just reheat the joint with a soldering iron until the solder melts. Then, carefully pull apart the parts while trying not to damage them.
What Temperature Do You Solder Led Strips?
When soldering LED strips, it is important to use the correct temperature. The recommended temperature for soldering LED strips is between 350-410 degrees Fahrenheit. If the temperature is too low, the solder will not flow properly and if the temperature is too high, the solder can become brittle.
How To Solder Led Strip Lights – How To Cut and Solder RGB LED Strip Lights
Conclusion
Have you ever wanted to add some LEDs to your project, but didn’t know how to solder them? This tutorial will show you how to do just that!
First, gather your materials.
You will need an LED strip, some wire, and a soldering iron. Then, cut the LED strip to the length you need. Next, tin the wires by heating them up with the soldering iron and adding a bit of solder.
This will make it easier to connect the wires to the LED strip.
Now it’s time to connect the wires to the LED strip. Place the wire on top of one of the pads on the LED strip, and then heat it up with the soldering iron until the solder melts and flows onto both the wire and pad.Repeat this process for all ofthe pads onthe LED strip.
Finally, trim any excess wire or solder fromthe connections using a sharp knife or scissors. That’s it – you’ve now successfully soldered an LED strip!