
The crankshaft position (CKP) sensor is a vital component in modern automotive engines, responsible for providing critical data that enables precise engine timing and optimal performance. As the name suggests, the CKP sensor monitors the position and rotational speed of the engine’s crankshaft, relaying this information to the engine control module (ECM). This data is crucial for accurate fuel injection, ignition timing, and overall engine efficiency.
Testing the CKP sensor is an essential diagnostic step when troubleshooting engine issues related to misfires, rough idling, or poor performance. By understanding how to test the CKP sensor properly, automotive enthusiasts, mechanics, and DIY enthusiasts can diagnose potential problems early on and save time and money on unnecessary repairs. In this guide, we will explore the various methods to test the CKP sensor, enabling you to identify faults, ensure precise engine operation, and get your vehicle back on the road with confidence.
- Locate the CKP Sensor: First, locate the crankshaft position (CKP) sensor on your vehicle’s engine block
- This component can typically be found close to where the transmission and engine meet
- Disconnect Power Supply: Next, disconnect the power supply for the CKP sensor by unplugging it from its corresponding plug in order to prevent any electrical shocks or damage during testing
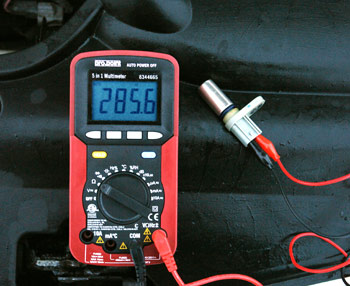
- Test Voltage Outputs: Use a multimeter to test both of the voltage outputs that are connected to each terminal of the CKP sensor while cranking over your vehicle’s engine with a starter motor or battery cable jumpers. The voltage should fluctuate between 0-5 volts depending on your specific make and model of car or truck when tested this way; if not functioning correctly, then you may need to replace it with a new one in order to restore performance back up proper levels again
- Check Connections: Make sure all connections are secure before reinstalling everything back together and turning power back on for further operation tests; if needed also check wiring harnesses for any wear/tear damage as well at this time too just in case something went wrong along those lines instead during regular driving use etc
How To Test Crankshaft Position Sensors (CKP) The Right Way
How to Test a Crank Sensor With a Multimeter
Testing a crank sensor with a multimeter is an easy process that anyone can do. First, you need to turn off your car and disconnect the negative battery terminal. Then, locate the crank sensor wiring connector and unscrew it so you can access the terminals inside.
Using your multimeter set to ohms, connect one lead of the meter to each terminal in the crank sensor harness while cranking your engine over. The reading should be between 800-1200 ohms if the crank sensor is functioning correctly. If not, then it’s time for a replacement!
How to Bypass Crank Position Sensor
One way to bypass a crank position sensor is to install an external trigger wheel and corresponding pickup coil. This can be done by replacing the existing crank pulley with one that has an integrated trigger wheel, or by installing a separate trigger wheel between the crankshaft and engine block. The pickup coil will then detect changes in the rotation of the trigger wheel as it passes over its teeth, providing signals to your vehicle’s ECU which can be used instead of those from the original crank position sensor.
How to Test 2 Wire Crank Sensor With Multimeter
Testing a 2 wire crank sensor with a multimeter is relatively easy. First, make sure the engine is off and then disconnect the negative battery cable to prevent any potential electric shock. Then connect one of your multimeter leads to the signal wire on the crank sensor and touch the other lead to ground.
When you turn on your ignition switch, you should get a reading between 0-5 volts depending on your vehicle’s engine size, if not then there may be an issue with the crank sensor and it will need to be replaced or repaired.
How to Test 3 Wire Crank Sensor With Multimeter
Testing a 3 wire crank sensor with a multimeter is an important step when attempting to diagnose any issues that may affect its performance. To do so, the negative lead of the multimeter should be connected to the body or engine block, and the positive lead should be connected to one of the three wires coming from the sensor. The voltage reading on your meter can then tell you if there is an issue with one or more of those wires.
If it reads 0 volts, then there could potentially be a problem with either the wiring or connections between them and/or their electrical sources.
Credit: www.samarins.com
Related Question and Answer about the Testing Ckp Sensor
How Do You Test a Crankshaft Sensor?
Testing a crankshaft sensor is relatively straightforward and requires a few basic tools. It can be done with an ohmmeter, multimeter or scan tool to diagnose the issue:
– Disconnect the electrical connector from the crankshaft sensor.
Check for any visible damage around the harness connection and on the sensor itself.
– Set your meter to its lowest resistance range, then touch one lead of it to each terminal on the crankshaft sensor’s electrical connector. Measurement should indicate an infinite resistance reading; no continuity means good condition of this component.
– Connect your meter leads directly to both terminals on the crank sensor itself, bypassing any wiring in between them if possible (measurement should read within manufacturer specifications).
– If using a scan tool, check for any codes related to engine speed or misfires that may be caused by faulty operation of this component. If present – replace it promptly as recommended by vehicle manufacturer instructions.
How Do I Test a Crankshaft Sensor With a Multimeter?
Testing a crankshaft sensor with a multimeter requires the following steps:
• Disconnect the negative cable of your car’s battery.
• Locate the crank sensor and disconnect its electrical connector.
• Set your multimeter to measure resistance in ohms (Ω).
• Connect the leads of your multimeter to the terminals of the connector. The reading should be within manufacturer specifications for this particular part, typically about 400-700 Ω.
• If not, replace or repair as necessary.
How Can You Tell If Your Crankshaft Position Sensor is Bad?
To determine if a crankshaft position sensor is bad, there are several symptoms that can be observed:
• Engine misfires or stalls when accelerating.
• Check engine light is illuminated on the dashboard.
• Rough idle and trouble starting the car.
• Reduced fuel efficiency and power output from the engine.
How Do You Test a 3 Pin Crank Sensor?
Testing a 3 pin crank sensor requires the use of an oscilloscope. This device will measure voltage changes as the crankshaft rotates and determine if there are any irregularities in the signal pattern. To test, connect the black lead of the oscilloscope to ground and connect each of the three leads from the sensor to their respective pins on your scope.
Set up a scan rate at 10KHz/sec, then rotate or spin your engine’s crankshaft while viewing readings on your scope screen.
The following steps should be taken:
• Connect oscilloscope to power
• Attach black lead from oscilloscope to ground
• Connect each lead from crank sensor to its appropriate pin on scope
• Set scan rate at 10KHz/sec
• Rotate engine’s crankshaft slowly while monitoring readings on scope screen
How to Test 3 Wire Crank Position Sensor With Multimeter?
Testing a three wire crank position sensor with a multimeter is relatively simple and straightforward. Here are the steps to follow:
– Set the multimeter to ohms or resistance mode.
– Connect one probe of the meter to ground, or negative, on the vehicle’s battery.
– Connect the other probe of the meter to each wire in turn.
– Record each reading for comparison against manufacturer specifications.
– If any readings are not within specification, replace the sensor as needed.
What is the Voltage of the Crankshaft Position Sensor?
The voltage of the crankshaft position sensor is typically 5V. It can range from 4-6V depending on the make and model of the vehicle:
• 4-5V for older vehicles
• 5-6V for newer models
Conclusion
Testing your Ckp Sensor is an important part of regular vehicle maintenance. By following the steps outlined above, you can easily and quickly diagnose any problems with this essential component in your engine. With proper testing and maintenance, the Ckp Sensor will ensure that your car runs smoothly for years to come!